# Front-End Design Pattern
## Module pattern
`Module` là một đoạn code độc lập mà chúng ta có thể chỉnh sửa mà không làm ảnh hưởng đến các phần khác của code. `Module` cũng cho phép chúng ta tránh lạm dụng namespace bằng cách cho phép tạo các scope riêng biệt cho các biến. Chúng ta cũng có thể tái sử dụng `module` trong các project khác vì bản chất của `module` là tách biệt, không phụ thuộc vào các phần code khác.
Trong các ứng dụng JavaScript hiện nay, `Module` là một phần không thể thiếu. `Module` giúp code sạch hơn, tách biệt và có tổ chức hơn.
Không giống như những ngôn ngữ lập trình khác, JavaScript không có các phương thức để định nghĩa biến public, private (hay còn gọi là access modifier). Vậy nên `Module Pattern` được sử dụng để giả lập tính chất đóng gói của hướng đối tượng.
Model
Pattern này thường sử dụng IIFE (immediately - invoked function expression), closures và function scope để giả lập concept này. Ví dụ:
```javascript
const myModule = (function() {
const privateVariable = 'Hello World';
function privateMethod() {
console.log(privateVariable)
}
return {
publicMethod: function() {
privateMethod();
}
}
})();
myModule.publicMethod();
```
Bằng cách sử dụng IIFE, đoạn code trên được thực thi ngay lập tức, và trả về một object để gán vào biến `myModule`. Nhờ có closure, object trả về vẫn có thể truy cập vào các hàm và biến được định nghĩa bên trong IIFE ngay cả khi IIFE đã thực thi xong.
Vậy nên các biến và hàm định nghĩa trong IIFE được giấu đi khỏi outer scope và từ đó trở nên private với biến `myModule`
Sau khi thực thi xong, biến `myModule` sẽ có dạng như sau:
```javascript
const myModule = {
publicMethod: function() {
privateMethod();
}
};
```
Khi đó chúng ta có thể gọi publicMethod(), phương thức này sẽ gọi tới privateMethod()
```javascript
module.publicMethod(); // prints 'Hello World'
```
## Revealing Module Pattern
`Revealing Module Pattern` có thể coi là phiên bản cải tiến của Module Pattern. Vấn đề của `module pattern` là chúng ta phải tạo các public function chỉ để gọi tới các private function và variable.
#### Sample workflow:
```javascript
let function_name = () => {
let first_function = () => {
// do something...
}
let second_function = () => {
// do something...
}
// More functions we may add on....
return {
calling_method_name : original_method_name,
...
}
}
```
Trong pattern này, chúng ta map các thuộc tính của object trả về với các private function mà chúng ta muốn public. Đó cũng chính là lí do nó được gọi là `Revealing Module Pattern`. Ví dụ:
```javascript
const my RevealingModule = (function() {
let privateVar = 'Peter';
const publicVar = 'Hello World';
function privateFunction() {
console.log('Name: ' + privateVar);
}
function publicSetName(name) {
privateVar = name;
}
function publicGetName() {
privateFunction();
}
/** reveal methods and variables by assigning them to object properties */
return {
setName: publicSetName,
greeting: publicVar,
getName: publicGetNAme
};
})();
myRevealingModule.setName('Mark');
// prints Name: Mark
myRevealingModule.getName();
```
Pattern này làm cho code dễ đọc hiểu hơn, sau khi thực thi `myRevealingModule` sẽ có dạng như sau:
```javascript
const myRevealingModule = {
setName: publicSetName.
greeting: publicVar,
getName: publicGetName
};
```
Chúng ta có thể gọi `myRevealingModule.setName('Mark')`, tham chiếu tới hàm nội tại `publicSetName` và `myRevealingModule.getName()`, tham chiếu tới hàm nội tại `publicGetName`. Ví dụ:
```javascript
myRevealingModule.setName('Mark');
// prints Name: Mark
myRevealingModule.getName();
```
## ES6 Module
Trước sự xuất hiện của ES6, JavaScript không hề có feature tạo module, vậy nên các lập trình viên phải dựa vào các thư viện thứ ba hoặc `Module Pattern` để implement module. Nhưng với ES6, mọi chuyện đã khác.
`ES6 Module` được lưu các file riêng biệt. Chỉ duy nhất một module trong một file. Mọi thứ trong một module mặc định là private. Function, variable, và class được expose ra ngoài bằng cách sử dụng `export` keyword. Và code trong một module luôn ở `strict mode`.
### Export module
Có 2 cách để export một khai báo function và variable:
* Sử dụng keyword `export` trước khai báo function và variable. Ví dụ:
```javascript
// utils.js
export const greeting = 'Hello World';
export function sum(num1, num2) {
console.log('Sum:', num1, num2);
return num1 + num2;
}
export function subtract(num1, num2) {
console.log('Subtract:', num1, num2);
return num1 - num2;
}
// This is a private function
function privateLog() {
console.log('Private Function');
}
```
* Sử dụng `export` keyword ở cuối file kết hợp với tên function và variable muốn export. Ví dụ:
```javascript
// utils.js
function multiply(num1, num2) {
console.log('Multiply:', num1, num2);
return num1 * num2;
}
function divide(num1, num2) {
console.log('Divide:', num1, num2);
return num1 / num2;
}
// This is a private function
function privateLog() {
console.log('Private Function');
}
export {multiply, divide};
```
### Import module
Tương tự như export một module, có hai cách để import một module bằng cách sử dụng `import` keyword. Ví dụ:
* Import nhiều item một lần
```javascript
// main.js
// import nhiều item
import { sum, multiply } from './utils.js';
console.log(sum(3, 7));
console.log(multiply(3, 7));
```
* Import cả một module
```javascript
// main.js
// import cả module
import * as utils from './utils.js';
console.log(utils.sum(3, 7));
console.log(utils.multiply(3, 7));
```
### Import và Export có thể được alias
Chức năng này được sinh ra để tránh các conflict trong naming. Ví dụ:
* Alias export
```javascript
// utils.js
function sum(num1, num2) {
console.log('Sum:', num1, num2);
return num1 + num2;
}
function multiply(num1, num2) {
console.log('Multiply:', num1, num2);
return num1 * num2;
}
export {sum as add, multiply};
```
* Alias import
```javascript
// main.js
import { add, multiply as mult } from './utils.js';
console.log(add(3, 7));
console.log(mult(3, 7));
```
## Singleton pattern
`Singleton` là một object chỉ khởi tạo duy nhất một lần, nghĩa là nó chỉ tạo một instance mới của một class nếu chưa tồn tại instance nào, còn nếu có thì nó chỉ việc trả lại instance đó. Nhờ vậy mà dù có gọi hàm khởi tạo nhiều lần thì chúng ta cũng chỉ nhận được một object duy nhất, giúp tránh lãng phí bộ nhớ.
Singleton Design Pattern
JavaScript đã xây dựng sẵn `singleton` như là một tính năng, được gọi là `object literal`. Ví dụ:
```javascript
const user = {
name: 'Peter',
age: 25,
job: 'Teachcer',
greet: function() {
console.log('Hello!');
}
}
```
Bởi vì mỗi object trong JavaScript chiếm một vùng trong bộ nhớ và khi gọi tới object `user`, chúng ta nhận được một tham chiếu tới nó. Nếu thử gán biến `user` vào một biến khác và thay đổi biến đó. Ví dụ:
```javascript
const user1 = user;
user1.name = 'Mark';
```
Điều này làm thay đổi cả 2 object bởi vì JavaScript truyền tham chiếu chứ không phải truyền giá trị. Vậy nên vẫn chỉ có duy nhất một object trong bộ nhớ:
```javascript
// prints 'Mark'
console.log(user.name);
// prints 'Mark'
console.log(user1.name);
// print true
console.log(user === user1);
```
Chúng ta cũng có thể implement `Singleton` bằng `Module pattern`. Ví dụ:
```javascript
const singleton = (function() {
let instance;
function init() {
return {
name: 'Peter',
age: 24,
}
};
return {
getInstance: function() {
if(!instance) {
instance = init();
}
return instance;
}
}
})();
```
Trong đoạn code trên, chúng ta tạo một instance mới bằng cách gọi hàm `singleton.getInstance`. Nếu một instance đã tồn tại, hàm này đơn giản chỉ trả về instance đó, nếu instance chưa tồn tại, nó tạo một instance mới bằng hàm `init()`
## Factory Pattern
`Factory Pattern` là một pattern sử dụng phương thức đặc biệt để tạo các object mà không cần chỉ định rõ chính xác class hay constructor nào,
Pattern này có ích trong trường hợp chúng ta cần khởi tạo nhiều loại object phụ thuộc vào một số điều kiện nhất định. Ví dụ:
```javascript
class Car {
constructor(options) {
this.door = options.doors || 4;
this.state = options.state || 'brand new';
this.color = options.color || 'white';
}
}
class Truck {
constructor(options) {
this.doors = options.doors || 4;
this.state = options.state || 'used';
this.color = options.color || 'black';
}
}
class VehicleFactory {
createVehicle(options) {
if(options.vehicleType === 'car') {
return new Car(options);
} else if(options.vehicleType === 'truck') {
return new Truck(options);
}
}
}
```
Ở đây chúng ta tạo các class `Car` và `Truck` (với một vài giá trị mặc định) là nguyên mẫu cho các object. Sau đó định nghĩa thêm class `VehicleFactory` có nhiệm vụ khởi tạo và trả về một trong hai object ở trên dựa vào thuộc tính `vehicleType` trong `options`
```javascript
const factory = new VehicleFactory();
const car = factory.createVehicle({
vehicleType: 'car',
doors: 4,
color: 'silver',
state: 'Brand New'
});
const truck = factory.createVehicle({
vehicleType: 'truck',
doors: 2,
color: 'white',
state: 'used'
});
// Prints Car {doors: 4, state: "Brand New", color: "silver"}
console.log(car);
// Prints Truck {doors: 2, state: "used", color: "white"}
console.log(truck);
```
Tạo một object `factory` từ class `VehicleFactory`. Sau đó chúng ta tạo một object của `Car` hoặc `Truck` bằng hàm `factory.createVehicle` và truyền object `options` là tham số bao gồm thuộc tính `vehicleType` là `car` hoặc `truck`.
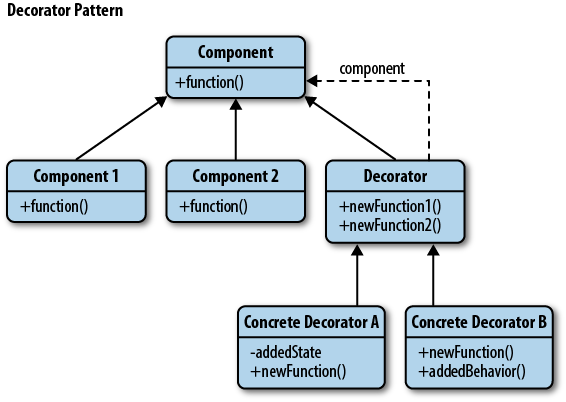
## Decorator Pattern
Decorator pattern được sử dụng để mở rộng chức năng của một object mà không làm thay đổi class hiện tại hay hàm tạo. Pattern này có thể được sử dụng để thêm feature mới vào object.
The decorator pattern
Ví dụ đơn giản:
```javascript
function Car(name) {
this.name = name;
// Default values
this.color = 'White';
}
// Creating a new Object to decorate
const tesla = new Car('Tesla Model 3');
// Decorating the object with new functionality
tesla.setColor = function(color) {
this.color = color;
}
tesla.setPrice = function(price) {
this.price = price;
}
tesla.setColor('black');
tesla.setPrice(49000);
// Prints blank
console.log(tesla.color);
```
Một ví dụ thực tế khác
Giả sử giá của xe phụ thuộc vào số tính năng nó có. Nếu không sử dụng decorator pattern, chúng ta sẽ phải tạo nhiều class khác nhau cho tượng trưng cho mỗi loại xe, mỗi class lại định nghĩa một cost method để tính giá trị.
```javascript
class Car() {
}
class CarWithAC() {
}
class CarWithAutoTransmission {
}
class CarWithPowerLocks {
}
class CarWithACandPowerLocks {
}
```
Nhưng với decorator pattern, chúng ta chỉ cần tạo một base class `Car` và tính toán giá dựa vào decorator function. Ví dụ:
```javascript
class Car {
constructor() {
// Default Cost
this.cost = function() {
return 20000;
}
}
}
// Decorator function
function carWithAC(car) {
car.hasAC = true;
const prevCost = car.cost();
car.cost = function() {
return prevCost + 500;
}
}
// Decorator function
function carWithAutoTransmission(car) {
car.hasAutoTransmission = true;
const prevCost = car.cost();
car.cost = function() {
return prevCost + 2000;
}
}
// Decorator function
function carWithPowerLocks(car) {
car.hasPowerLocks = true;
const prevCost = car.cost();
car.cost = function() {
return prevCost + 500;
}
}
```
Class `Car` để khởi tạo các object, sau đó được truyền vào decorator function để override hàm `cost` tính giá mới và thêm các thuộc tính xác định tính năng được thêm vào cho `car` instance. Khi sử dụng:
```javascript
const car = new Car();
// Prints 20000
console.log(car.cost());
carWithAC(car);
carWithAutoTransmission(car);
carWithPowerLocks(car);
// Calculating total cost of the car
// Prints 23000
console.log(car.cost());
```
---
# Agent Instructions: Querying This Documentation
If you need additional information that is not directly available in this page, you can query the documentation dynamically by asking a question.
Perform an HTTP GET request on the current page URL with the `ask` query parameter:
```
GET https://vick7-education.gitbook.io/freshforfresh/design-pattern/front-end-design-pattern.md?ask=
```
The question should be specific, self-contained, and written in natural language.
The response will contain a direct answer to the question and relevant excerpts and sources from the documentation.
Use this mechanism when the answer is not explicitly present in the current page, you need clarification or additional context, or you want to retrieve related documentation sections.